hexo_debug小记
正文
此贴用来纪录hexo博客使用过程中遇到的一些问题
文章加密
hexo-blog-encrypt
安装
1 | |
配置
在_config.yml中加入1
2
3
4
5
6
7
8
9# Security
encrypt: # hexo-blog-encrypt
abstract: 有东西被加密了, 请输入密码查看.
message: 您好, 这里需要密码.
tags:
- {name: tagName, password: 密码A}
- {name: tagName, password: 密码B}
wrong_pass_message: 抱歉, 这个密码看着不太对, 请再试试.
wrong_hash_message: 抱歉, 这个文章不能被校验, 不过您还是能看看解密后的内容.
使用
在文件头写入如下1
2
3
4
5
6
7
8
9
10
11---
title: Hello World
tags:
- 作为日记加密
date: 2016-03-30 21:12:21
password: mikemessi
abstract: 有东西被加密了, 请输入密码查看.
message: 您好, 这里需要密码.
wrong_pass_message: 抱歉, 这个密码看着不太对, 请再试试.
wrong_hash_message: 抱歉, 这个文章不能被校验, 不过您还是能看看解密后的内容.
---
只需要将博文头部的 password 设置为 “” 即可取消 Tag 加密.
文章附图插件
hexo-asset-img
安装
1 | |
配置
在_config.yml中将下面字段改成true。1
post_asset_folder: true
使用
安装完成后,hexo n 新建笔记时会同时新建一个同名文件夹,文章插图可以放在文件夹中,然后直接在文章中引用图片名即可。无需相对路径。
文章中文导致URL失效
hexo-abbrlink
安装
1 | |
配置
在_config.yaml中
将permalink修改如下:1
2
3
4permalink: posts/:abbrlink/
abbrlink:
alg: crc32 #算法: crc16(default) and crc32
rep: hex #进制: dec(default) and hex

算法 进制 可自行选择,permalink 网上有些教程是 posts/abbrlink.html 但如果用了hexo-asset-img会出现冲突,所以同时用了两个插件的则按 本帖修改下。
与hexo-asset-img冲突解决
vim 打开 node_modules\hexo-asset-image\index.js
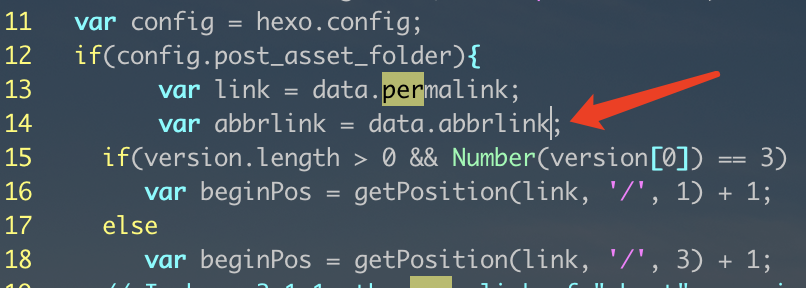
在13左右的var link = data.permalink; 下方添加一行1
var abbrlink = data.abbrlink;
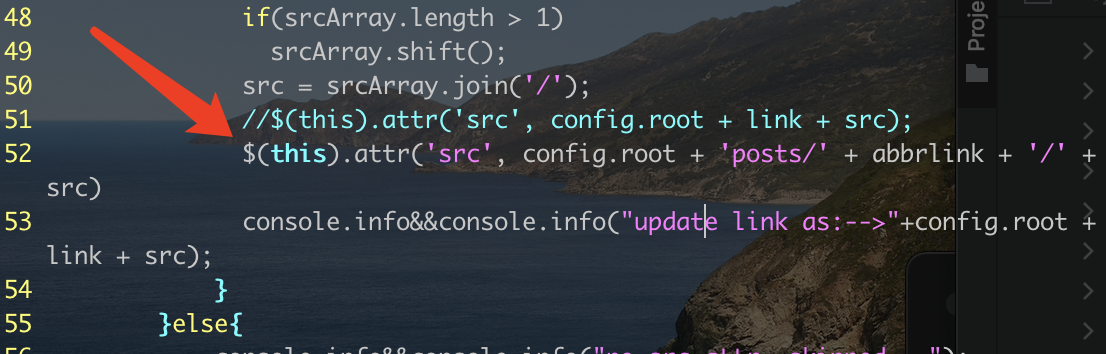
然后在51行左右找到 $(this).attr('src', config.root + link + src); 将其注释改写成如下:1
$(this).attr('src', config.root + 'posts/' + abbrlink + '/' + src)
使用
hexo clean 清除下hexo g 重新生成下即可
hexo-sublime
本地没有安装hexo,而是使用sublime来写。所以给出一些常用配置
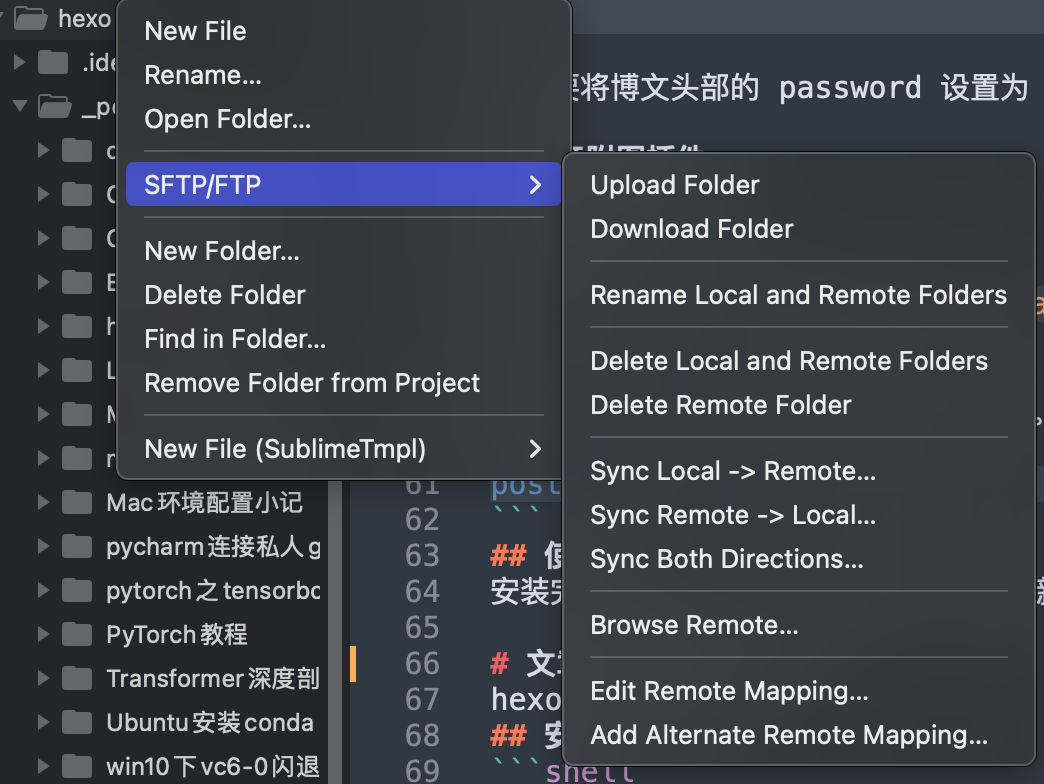
本地与服务器同步
- sublime安装SFTP 直接shift+command+p 输入install 然后输入SFTP安装成功
- 本地新建一个文件夹用于存放hexo文档。然后在文件夹下创建一个 sftp-config.json的文件来配置sftp信息3.然后就可以愉快的使用了,写完后会自动同步到服务器端。
1
2
3
4
5
6
7
8
9
10
11
12
13
14
15
16
17
18
19
20
21
22
23
24
25
26
27
28
29
30
31
32
33
34
35
36
37
38
39
40
41
42
43
44
45
46
47
48
49
50
51
52
53
54
55
56
57{
// The tab key will cycle through the settings when first created
// Visit https://codexns.io/products/sftp_for_subime/settings for help
// sftp, ftp or ftps
"type": "sftp",
// 上传前保存在本地
"save_before_upload": true,
//保存同时自动上传
"upload_on_save": true,
// 本地打开某个文件时,自动下载服务器代码
"sync_down_on_open": true,
//同步时跳过删除的文件
"sync_skip_deletes": false,
"sync_same_age": true,
//开启「下载确认」
"confirm_downloads": false,
//开启「同步确认」
"confirm_sync": true,
//开启「覆盖确认」
"confirm_overwrite_newer": false,
// 服务器域名||io
"host": "**.**.**.***",
// 服务器用户名
"user": "***",
// 服务器密码
"password": "*********",
//"port": "22",
"remote_path": "/var/www/hexo/source", //这里是服务器上对应同步的文件路径。我这里就只同步source里面的文件在本地
//过滤 本来想着是同步时不下载一些很大的文件到本地的,比如固化的模型,pdf, 视频啥的,但好像没啥用。
"ignore_regexes": [
"\\.sublime-(project|workspace)", "sftp-config(-alt\\d?)?\\.json",
"sftp-settings\\.json", "/venv/", "\\.svn/", "\\.hg/", "\\.git/", "\\.pdf/", "\\.mp4/",
"\\.bzr", "_darcs", "CVS", "\\.DS_Store", "Thumbs\\.db", "desktop\\.ini"
],
//"file_permissions": "664",
//"dir_permissions": "775",
//"extra_list_connections": 0,
"connect_timeout": 30,
//"keepalive": 120,
//"ftp_passive_mode": true,
//"ftp_obey_passive_host": false,
//"ssh_key_file": "~/.ssh/id_rsa",
//"sftp_sudo": false,
//"sftp_flags": ["-F", "/path/to/ssh_config"],
//"preserve_modification_times": false,
//"remote_time_offset_in_hours": 0,
"remote_encoding": "utf-8",
//"remote_locale": "C",
//"allow_config_upload": false,
}
sublime模版化新建hexo
服务器端hexo n会自动创建带有文件头信息的模版。这里通过sublime新建模版也大致能实现
- 安装SublimeTmpl
新建一个hexo.tmpl 放入到subliem 模版目录:’/Users/*//Library/Application Support/Sublime Text/Packages/SublimeTmpl/templates’ 这个路径找了我好久,这里直接给出吧。
1
2
3
4
5
6
7
8---
title:
tags:
-
categories:
-
date:
---然后在’/Users/*//Library/Application Support/Sublime Text/Packages/SublimeTmpl/Main.sublime-menu’中加入
1
2
3
4
5
6
7
8{
"id": "hexo",
"caption": "hexo",
"command": "sublime_tmpl",
"args": {
"type": "hexo"
}
},对应另外几个文件还有给他设置快捷键的,不设置也没啥。这样在新建中就会有hexo模版的新建了

给模版自动插入当前时间
手动输入时间太蠢了,这里做个快捷方式插入当前系统时间
新建一个insert_current_time.py文件,输入下面代码然后保存到: ‘/Users/*/Library/Application Support/Sublime Text/Packages/User/‘
1
2
3
4
5
6
7
8
9
10
11import datetime
import sublime_plugin
class InsertCurrentTime(sublime_plugin.TextCommand):
def run(self, edit):
self.view.run_command("insert_snippet",
{
"contents": "%s" % datetime.datetime.now().strftime("%Y-%m-%d %H:%M:%S")
}
)打开Key bindings在右侧输入

1
2
3
4[
{ "keys": ["command+1"], "command": "insert_current_time" },
]这样按下command+1时就会自动插入当前时间了。
hexo | nginx
服务器上采用nginx挂载的网站,所以记录下
- nginx 配置路径:
/etc/nginx/vhost - 修改配置后输入
systemctl restart nginx重启服务
live2D
安装
hexo-helper-live2d官方中文文档npm install --save hexo-helper-live2d
添加配置文件
在 hexo 博客到 _config.yml 文件添加以下配置 建议在根目录下的 _config.yml 配置,这样以后换了主题就不用重新配置了 当然也可以在themes下的 _config.yml 配置但是要注意模型目录要填写正确1
2
3
4
5
6
7
8
9
10
11
12
13
14
15
16
17
18
19
20live2d:
enable: true # 是否启动
scriptFrom: local # 默认
pluginRootPath: live2dw/ # 插件在站点上的根目录(相对路径)
pluginJsPath: lib/ # 脚本文件相对与插件根目录路径
pluginModelPath: assets/ # 模型文件相对与插件根目录路径
tagMode: false # 标签模式, 是否仅替换 live2d tag标签而非插入到所有页面中
debug: false # 调试, 是否在控制台输出日志
model:
    use: live2d-widget  ## 模型文件
display:
position: right # 定位方向 left right top bottom
width: 150 # 小人宽度
height: 300 # 小人高度
hOffset: -15 # 向 偏移
vOffset: -15 # 像 偏移
mobile:
show: true # 手机端是否显示
react:
opacity: 0.7 # 模型透明度
修改你喜欢的模型
你可以在这里找到你喜欢的模型1
2
3
4
5
6
7
8
9
10
11
12
13
14
15
16
17
18
19
20
21
22live2d-widget-model-chitose
live2d-widget-model-epsilon2_1
live2d-widget-model-gf
live2d-widget-model-haru/01 (use npm install --save live2d-widget-model-haru)
live2d-widget-model-haru/02 (use npm install --save live2d-widget-model-haru)
live2d-widget-model-haruto
live2d-widget-model-hibiki
live2d-widget-model-hijiki
live2d-widget-model-izumi
live2d-widget-model-koharu
live2d-widget-model-miku
live2d-widget-model-ni-j
live2d-widget-model-nico
live2d-widget-model-nietzsche
live2d-widget-model-nipsilon
live2d-widget-model-nito
live2d-widget-model-shizuku
live2d-widget-model-tororo
live2d-widget-model-tsumiki
live2d-widget-model-unitychan
live2d-widget-model-wanko
live2d-widget-model-z16
然后通过npm install npm install --save live2d-widget-model-xxx来安装你喜欢的模型 比方说作者喜欢的是koharu这个那就使用npm install npm install --save live2d-widget-model-koharu进行安装
安装后我们在node_modules目录下面找到live2d-widget-model-koharu这个文件夹,把这个文件夹复制下来 找到我们的hexo博客的根目录(因为我们是在根目录的_config.yml里添加的配置)新建一个文件夹叫做live2d_models,把刚刚我们复制的文件粘贴过来,这样我们就完成了99%,最后我们打开添加的配置文件,找到这一行1
2model:
use: live2d-widget ## 模型文件
把use后面改成我们复制在live2d_models文件夹里面的模型目录名称,这样我们就完成了修改使用hexo d || hexo deploy来部署,然后清除一下浏览器缓存,打开后就可以发现我们添加的小人已经在屏幕右下角看着你了。
本博客所有文章除特别声明外,均采用 CC BY-SA 4.0 协议 ,转载请注明出处!